I’m going to you the absolute best settings for the Facefusion app that worked for me. What to avoid and what’s the best model. So you don’t have to waste all that precious bandwidth and storage of yours.
Start
First of all I’m using version 3.1.1. But the general concept should be the same for all base 3 versions.
I’m assuming that you have Facefusion itself installed. It’s a straight forward process. Just get it from github and follow their docs.
Of course the first thing we’re gonna dive into is disabling the NSFW filter. why? Because I don’t want a dumb software to see some skin and block my results.
So go to this github repo. Follow the instructions in the Readme and disable the NSFW filter. I didn’t do the frame skip but you can if you want. It doesn’t matter for what we’re doing.
First time running
Well first time that you run the program it by default downloads the default faceswapper model. Which actually is the second to best one. But only a bit worse. We’ll get to the models later though. Just let it download and you got your first model ready.
At this part based on the docs you must check the processor of your choice based on the GPU you have. Or if you’re poor like me you’ll just see CPU and use that. If you can’t see your GPU option (for example CUDA for Nvidia), this means that you have fucked up a step in your process of installing. Follow the instructions carefully and you’ll see the options pop up.
Left Panel Settings
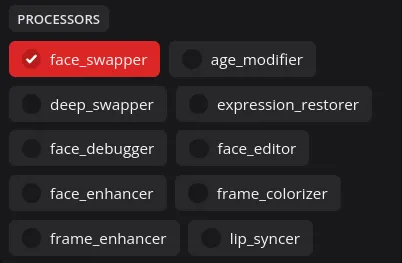
Processors
The processors are the stuff that let you manipulate your video or image. They’re pretty self explanatory. But here’s the brief explanation:
- face_swapper: Copy source face, Paste on Target. Simple
- age_modifier: Modifies age. No one cares
- deep_swapper: Pre trained models for special faces. For example swap Elon’s face on someone else. There are predefined so not everybody is there.
- expression_restorer: After swapping a face you might not get the expression that the target face had before swapping. With this you can restore the face expression. Like if the target was smiling but after swapping is not. This will make it smile again.
- face_debugger: This shows a mask around the face. apparently it’s useful for animation creators but you can try to see if the face of the target is being selected properly. So after changing the mask in the right panel which we will get to later you can see the mask change here and see if it’s correct.
- face_editor: Manually adjust the face. like make the head tilt, the eyes close and such things.
- face_enhancer: Usually after face swapping the quality of the image goes to shit because the models that we have are in that way. With this you can enhance and higher the quality of the output image.
- frame_colorizer: Self explanatory.
- frame_enhancer: Upscale the whole image.
- lip_syncer: Sync the lips to the audio.
So for my use case I only use face_swapper and face_enhancer. And sometimes face_debugger to check the mask. But now you know all the options.
Choosing processors here is order based. So choose them based on the order of effects you want to apply.
Choosing Models
Based on the processors that you chose above, you can choose models here. The software on top of this models is different but the models are all here. There isn’t a difference if you switch to another software because all the local ones use these models under the hood.
As I said above I only use face swapper and face enhancer. So I’ll only talk about those.
Face Swapper Model
The only models here that are worth checking are inswapper_128 and inswapper_128_fp16. All the others are trash. Actual trash. Between these two inswapper_128 is the better one by a hair but the fp16 is faster a little. So just choose inswapper_128. Choosing this will download the model.
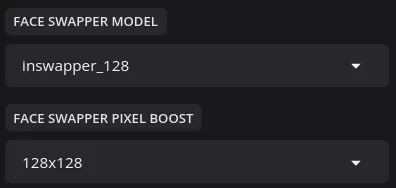
Face Swapper Pixel Boost
This process tries to higher the quality of the output. Just like face enhancer. As you make the resolution higher, the process takes a longer time. Going all the way to 1024x1024 makes it MUUUUCH slower. So I generally prefer to use the face enhancer to improve the quality. In my tests the results are pretty similar.
Face Enhancer Model
Leave it at the default which is gfpgan_1.4. This will give you the best result.
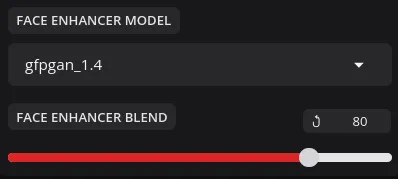
Face Enhancer Blend
When applying face enhancer the result can get plastic like. Meaning the skin will get so smooth that it makes it unreal. This is like a fill amount in photo editing apps. It says how much of the enhancing you like to apply. The default 80 is always too much for me so I usually do 50 or less.
The rest
Honestly the rest are pretty obvious. I generally leave them be.
Importing, Swapping. Middle Panel
After choosing your processors and their options you’re now ready to import your images. In the source you pick the source. The face that you want to copy paste. You can choose multiple images and it takes an average of those faces but the dev said anything beyond 4 or 5 images can make the results worse.
Then choose a target. This can be an image or a video. This has the face that you want to paste on. As soon as you do this you will see the preview panel give a preview of the first frame of the target. If it has a face it’ll already be swapped.
Masking the face. Right Panel
Sometimes your video has multiple faces. Or there are objects blocking part of the face sometimes. We need to make the program select the correct part of the face at all times. That’s when this section comes in.
Preview
Preview any frame of the video here. Or cut the video from and to certain frames so only those frames get swapped or whatever. Simple.
Masks
Face Selector Mode
-
reference: In this mode you choose a face from the Reference Face section and that applies the swap to that face. Throughout the video the face might change a little too much that it gets recognized as a new face so keep that in mind
-
one: This option is if that you only have one face in the image or the video and want to swap that.
-
many : This swaps all the faces in all frames with the source face.
Face Selector Options
These options allows you to choose people in the target based on their gender or race. For example if you chose many and choose female here it only targets all the females in the video. It’s not the most accurate but it works. The order goes in the order that it says. By default from the biggest face to the smallest. You can also modify the age but this is not accurate most of the time.
Face Occluder and Parser models
Leave them as default.
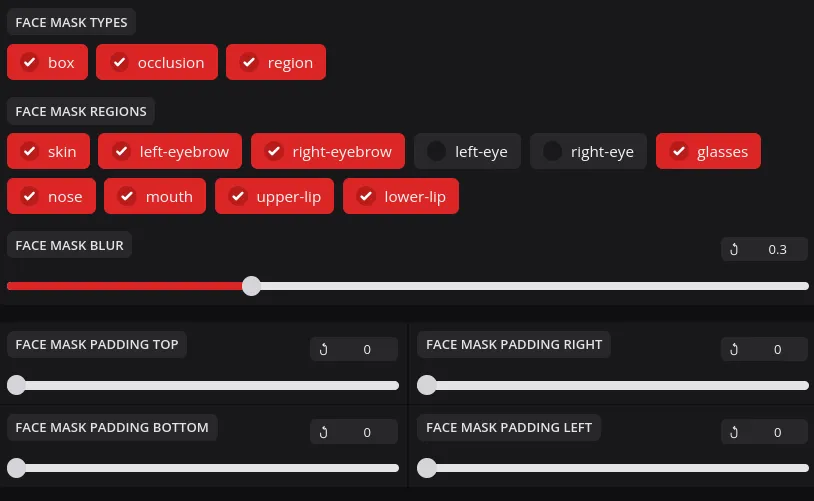
Face Mask types
These options allow you to select the face the way you want. By default the box option is a box around the target and swaps the face inside it. This is ok if the target face is always visible. But that’s not the case always. By applying the paddings below it you can make the box smaller.
Occlusion tries to mask out small things that cover the face for a little amount of time. Like for example if the target is smoking it tries to cut out the cigarette so it’s not swapped or effected. My pick
Region allows you to don’t mask specific parts of the face. Like for example you don’t want to swap the eyes of the target. You check region and deselect them.
- Mask types can be used together.
- You can use the face debugger processor to see the mask.
The rest
Face detector angles allows you to select at which angles the detector looks for faces. So if the person has their head tilted to the right the detector might not recognize it. So you can choose other angles for it to look.
Face detector score is how confident the detector must be that something is a face. If it can’t find the face in your video lower the value. Lowering it too much makes it find things that are not faces.
Face Landmarker model is fine by default. The score is the amount of confidence it has to where to place the new face. If your face doesn’t get swapped lower this value but lowering it too much spits our a cursed image definitely.
Run it
After applying all the things you want tap start from the bottom of the middle panel and it will spit out your file after it’s done in the output path that you can change above it. For checking the progress look at the terminal window. That’s all. If you don’t like the results fiddle with the settings. But if you don’t like the quality well there’s nothing you can do right now. The best model is small and basic and the creator of it doesn’t want to release a newer version. But hey I like the results most of the time.